| Informational Websites | ChronoMaddox -- the legacy of Chuck Maddox | OnTheDash -- vintage Heuer website | Zowie -- Omega information |
| Discussion Forums | ChronoMaddox Forum | Heuer Forum | Omega Forum |
| Counterfeit Watchers | ChronoTools Forum | ChronoTrader Forum |
|
|
The largest independent, non-commercial, consumer-oriented resource on the Internet for owners, collectors and enthusiasts of fine wristwatches. Online since 1998. | |||||||
|
||||||||
|
||||||||
Vintage Heuer Discussion Forum
The place for discussing 1930-1985 Heuer wristwatches, chronographs and dash-mounted timepieces. Online since May 2003. | |||||||
| |||||||
| |||||||
1. Paul Gavin
Close second Abel...
Personally mine are somewhere around 134th place!
Great work Paul, will be looking for some hands on tuition in 2010, over a beer.
R
: I was asked to give some tips on the subject of photographing
: watches so here goes:
: Often we see pictures of watches on the wrist of the wearer and for
: good reason. It allows you to easily move the watch into the
: best position to take the picture. Try it and you will see. The
: trick is to really look at the watch and not just admire it and
: try to find the best position which eliminates reflections,
: minimizes bright spots and gives good overall illumination. When
: you achieve this you take the picture with the other had. You
: will need an attractive wrist (bracelets optional), auto focus
: camera, a steady hand and good amount of light to keep the
: shutter speed as high as possible (minimum 60th of a second) to
: maintain sharpness.
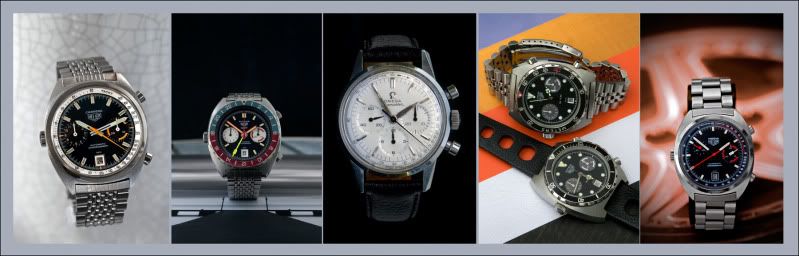
: I prefer to position the watch with some background interest, use a
: tripod with cable release for sharpness and strive to find the
: best lighting to achieve the same basic principal: eliminate
: reflections, minimize bright spots and get overall illumination.
: So this is how I do it:
: Lighting – This is the hard bit. Get the lighting right and you
: are almost guaranteed a good shot. You need an even light source
: that illuminates the dial without creating bright spots on the
: reflective/metallic surfaces. I use natural light. Either
: indoors with strong window light or outdoors in the shade. Avoid
: direct sunlight which creates too much contrast. My current
: system relies on a fairly bright to sunny day. Finally and the
: best tip I can offer, I use a reflector to balance the light. So
: if I am using window light I place the reflector on the opposite
: side of the watch/scene to the light source. This illuminates
: the side of the watch that may be in shadow. I covered an A4
: size piece of card with ordinary kitchen aluminium foil and it
: works perfectly.
: I have not used artificial lighting (diffused flash or reflected
: spotlight) but I am working on a lighting set-up with daylight
: fluorescents. If successful I will certainly share this with
: you. Obviously a good artificial lighting system affords you the
: convenience of taking pictures at any time of day or night.
: Set-up: This is where you can get creative by using props (watch
: boxes etc) and backgrounds to add some interest. Or, keep it
: simple with the watch on a watch stand and a plain background.
: Here are some examples:
:
: 
: Plenty people photograph watches successfully with a simple point
: and shoot camera. My objective is to produce the highest quality
: images possible. If you want my technique read on. If not at
: least try everything above and definitely make an aluminium foil
: reflector (and tell me how you got on).
: Equipment: I use a Nikon D300 with either a 55mm or 105mm f/2.8
: manual focus macro lens (the old pre-auto focus lenses). As I am
: mostly shooting indoors with window light and because I want to
: control the aperture (for dept of field/focus) I use a tripod,
: cable release and set the camera to mirror lockup. This
: eliminates camera shake when firing the shutter resulting in
: maximum sharpness. (Mirror lockup is a feature on some DSLR that
: helps to reduce camera shake when the shutter is fired).
: Camera Settings: I use the lowest ISO (200 in my case) and picture
: quality is set to RAW. If you use RAW as apposed to JPEG or TIFF
: you will need RAW converter software. This would have come with
: your camera’s image processing software eg Nikons Capture NX.
: I use the manual setting on the camera but you can use aperture
: priority to simplify the process.
: Taking the picture: Once I have the watch in place on the
: background I compose the picture through the viewfinder. This
: can be a time consuming process and will depend on what part of
: the watch or angle I wish to show and how complex or simple the
: composition. I then set the aperture depending on how much of
: the scene I want in focus eg f/11 or smaller for maximum depth
: of focus (front to back), f/4 or bigger aperture for minimum
: depth of focus (background with be blurred) and f/8 or f/5.6 for
: a mid range of depth of focus. If you use aperture priority
: setting on the camera the shutter speed will be set
: automatically. Finally, I will look through the viewfinder,
: focus the lens and position the reflector to give the best
: lighting without reflections. Finally, I take the picture.
: I do not generally bother with the histogram but I do check the
: image on the screen for reflections and general composition. I
: zoom in for a better view and check for depth of focus. If the
: composition works, bearing in mind that the most time consuming
: step is the set-up, I will bracket the exposure i.e. on manual
: setting I will take multiple images at slightly faster and
: slightly slower shutter speeds just to ensure I get the best
: exposure. Its digital and it cost nothing to take multiple
: images.
: Image Processing: My photographic background is film, the darkroom
: and lots of chemicals. I have given all that up for a digital
: camera and the computer has replace the darkroom. Getting the
: picture right in camera is essential and that has been explained
: above. However, that is just the beginning. The next step is to
: process the image in Photoshop or some other image processing
: software. Basic image processing includes rotating the image to
: get the vertical and horizontal planes correct, cropping,
: increasing or decreasing contrast, getting more shadow and
: highlight detail, sharpening, removing dust etc, etc, etc and
: that’s just the basics. I use the advanced version of
: Photoshop called CS3 but there is also the very reasonably
: priced and simpler version called Elements which is excellent.
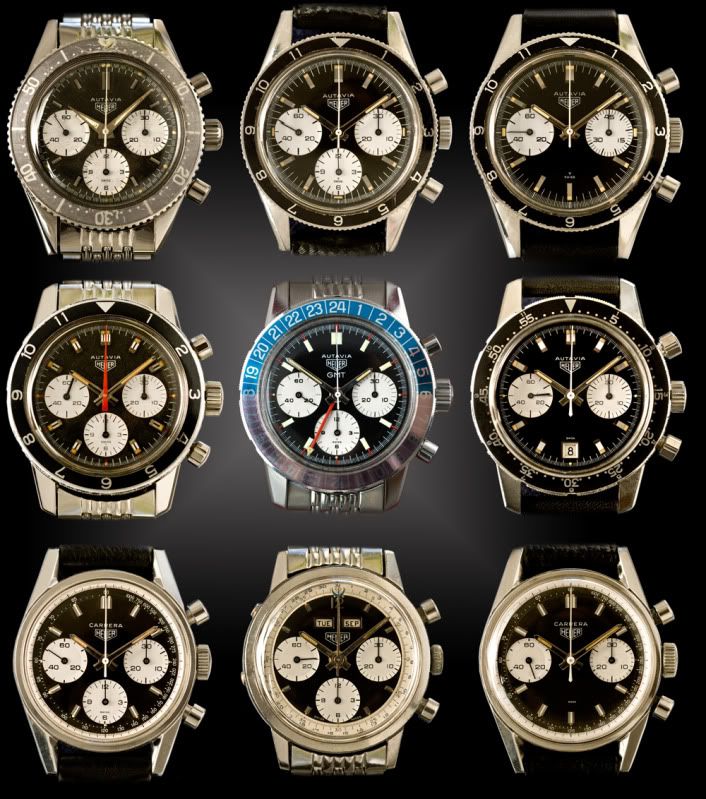
: The image below is a compilation of nine separate pictures all
: shot using the same lighting and set-up to get the consistency.
: Each image was then cropped, resized and dropped onto a
: background that had a simple effect applied to it. All done in
: Photoshop. I pre-visualized this image and knew what I wanted
: before I started. It helps when you know what you want to
: achieve before you start and then execute the process with the
: tools that you have available.
:
: 
: Explaining how I set-up and take the picture is easy compared with
: explaining image processing so I would recommend buying a good
: book and take time to learn the programme. One point I will
: make. When you take pictures in jpeg file format the image is
: processes by the camera. In RAW format, the image is unprocessed
: and post processing in Photoshop is essential. A RAW file is
: much larger than a jpeg and consequently it holds more
: information which implies more detail and quality of the final
: picture.
: If you made it this far I am impressed. I am more than happy to
: take emails if you have any questions or require more
: information on any of the points I have covered.
: By Paul Gavin
: January 2010
| Chronocentric and zOwie site design and contents (c) Copyright 1998-2005, Derek Ziglar; Copyright 2005-2008, Jeffrey M. Stein. All rights reserved. Use of this web site constitutes acceptance of the terms of use. | CONTACT | TERMS OF USE | TRANSLATE |